


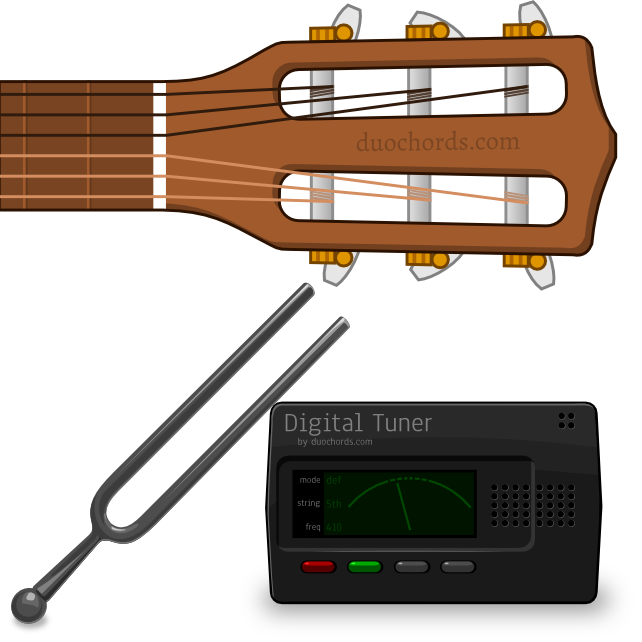
Tuning Equipment
This is the third tutorial of our Beginners Workshop. Today we want to tune a guitar the first time. The tuning of your guitar is very important, even during short practice sessions. If your guitar is out of tune, your chords and riffs will always sound wrong. That does not only reduce the fun while playing but can be very frustrating too (especially for beginners). In this tutorial I will explain the arrangement and designation of the guitar strings and I will introduce different techniques to tune your guitar. Even when you already tuned a guitar a few times, this tutorial might contain some useful tips you did not know yet.
The Arrangement of the Strings
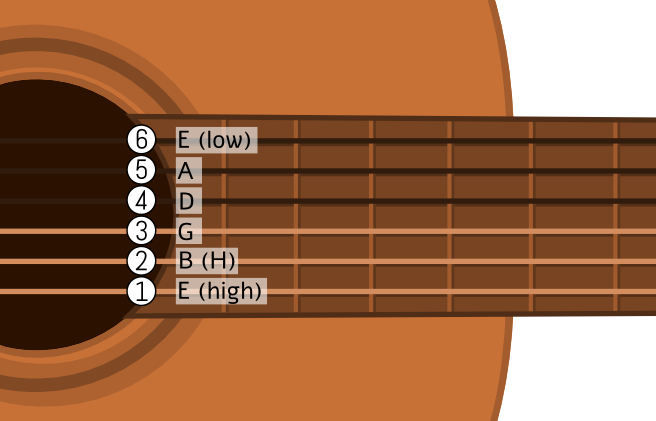
The names and numbers of the open strings
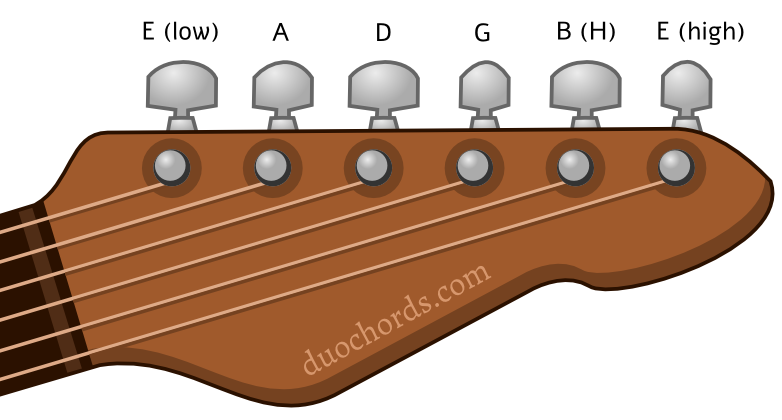
First of all, you have to know the proper notes for each open string (open string means that you do not put any finger on the fretboard while picking the string). Starting with the thickest string (the topmost) we have the following notes: E, A, D, G, B, E. This sequence can be easily remembered with the sentence “Eat Apples Daily Go-to Bed Early”.
As you can see, there are two E-Strings. To distinguish these, we call them the low-E and the high-E. Notice, that “high” and “low” do not mean the position of the string but refer to the pitch of the string. Therefore, the low-E is the topmost and thickest string. Additional to their notes, there are numbers defined for each string to identify them easily. I added those numbers to the illustration above. We will use those numbers in our further tutorials, so you should keep them in mind. You may have noticed, that I added an “H” behind the “B”, the reason is that this tone has different names in different countries.
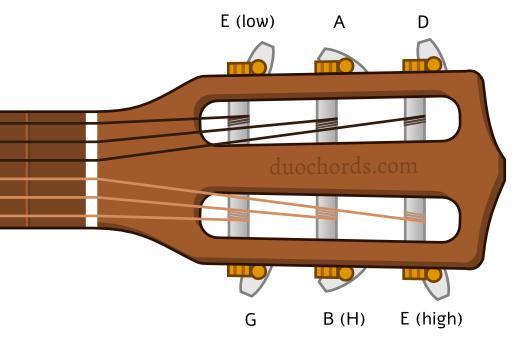
Now, we have to identify the strings at the guitar head correctly before we start to tune the guitar. There are different shapes of guitar heads around, but the order of the strings attached to the peg heads should be the same on every guitar. On Electric guitars, the assignment of the strings to the peg-heads is very trivial, because they both have the same order. The following illustration shows how the strings are attached to the Peg-Heads on different guitars.
-
- Typical Classical Guitar Head
-
- Typical Electric Guitar Head
-
- Typical Western Guitar Head

Finally we have to know in which direction we have to screw the peg-heads to tune a string higher or lower. This may be the most puzzling part during your first attempts to tune a guitar. The best would be to test it on one string by screwing the peg-head half a turn while picking the according string. The direction should be the same on every other string. However it depends on how the guitar was strung, so maybe you test it for each string the first time you tune a guitar.
Screwing the peg-heads means changing the tension of the string. Tightening a string makes the pitch (the note) of the string higher. But be careful! Making a string too tight, can cause it to break. Therefore, it is recommended to tune every string from the bottom up. That means, if you are not sure if the pitch is too high or too low, you should tune it down a little bit and then tune it up step by step until you are sure the tune is correct. This method is also recommended, because tuning from high to low tends us to slip out of tune. This has something to do with the way our brain processes what we hear. During my first months of guitar playing, I always had a lot of trouble with recognizing if a pitch was too high or too low. The bottom-up technique made the tuning of the guitar much easier. Maybe it’s helpful for you too.
The Easiest Way to tune a guitar
If you just want to tune your guitar right now and you do not even want to learn anything about how to do this step by step, you can use an according app. Using a computer or Mac with a Flash Plugin installed, simply visit the proguitartuner website. If you do not have the flash plugin installed or you are reading this on your mobile device, you should use the freetuner instead. Both websites will ask for permission to use your microphone. After granted permission, you can simply play a string of your guitar and the tool will show you if the pitch is too high or too low. Adjust the tension of the string by screwing the according peg head and pick the string again to display the changes. Repeat this until the string is tuned correctly and continue with the other strings. But note that both tools will not recognize the string correctly if its pitch is way too high/low. So in case you tune a guitar the very first time and it is heavily out of tune, consider to use reference tones instead and correct the tuning yourself. You can use this audio file for example to have a reference. There are many helpful apps for your phones and tablets available too. Simply check your app store and search for “guitar tuner”.
5th Fret Method
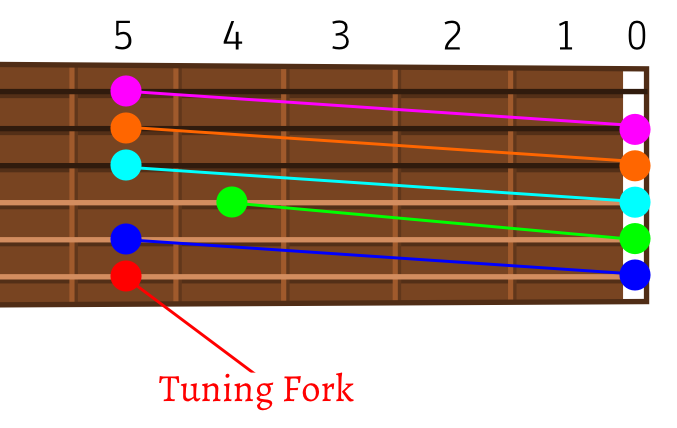
The 5th Fret Method is the standard method to tune a guitar. It is easy to learn and can be used without electronic devices. This method uses the fact that the note of every string can be played on the next-lower string by pushing a specific fret. For example, the high-E can be found on the fifth fret of the second string. The following illustration shows these relations for every string.
The relations between the strings
Now we have relations between all strings, but we have no starting point for our tuning. For tuning the first String we can use a different instrument such as a piano, a tuning fork or an electronic device. For example, onlinetuningfork.com simulates different tuning forks and can be used as a reference. I even found a youtube video containing the A-440 sound. The 440 stands for the vibration cycles per second by the way. If you use a real tuning fork instead of the digital ones, simply hit it against a chair, a table or your knee and then push the round knob against the body of your guitar. The sound you will hear is the A. You can now tune the first string (high-E) according to this note by pushing the fifth fret and picking the string at the same time. Adjust the tension of the string with the bottom-up method described above and repeat this process until your guitar has the exact same pitch as the tuning fork.
With the first string tuned, you can adjust all the other strings successive with the illustration above. You will continue with the second string by pushing its fifth fret and adjust its tuning with the open first string as reference. Then, you push the fourth fret at the third string with the open second string as reference and so on. When you reached the low-E, you can double-check your tuning by playing the first and the sixth string together. They should sound match each other and should not sound odd when played together. Otherwise, you should go through each string again.
If you do not have a Tuning fork or any other reference, you should at least tune the guitar in a way that it is in tune with itself. In this case, it is recommended to start with the low-E. Being the thickest string, it should get out of tune the least over time compared with the other strings. You can use the 5th fret method anyway, but in the opposite direction: Starting with tuning the open fifth string with the fifth fret on the sixth string as reference.
The Harmonics (flageolet) Method
Another method to tune a guitar is to use the so-called harmonics or flageolets. This method is used by more experienced guitarists but I want to give you an idea of this method. The flageolet tones are created by putting a finger on specific points of the strings without pressing them down. For example you can hold your finger gently on the 12th fret of a string (it is important to hold it not where you would press the string, but exactly above the fret strip). When picking the according string with the right hand, you will hear the note of the string but the pitch will be exactly one octave higher. This can be used to tune the guitar as we already learned above. But the advantage from this technique is, that the sound will remain even if you remove your finger from the string. While screwing the peg-head, you will hear the actual pitch and can adjust it without having to push/ pick the string again. This method is therefore a bit more comfortable, but it is a bit harder to learn. Maybe we will come back to this technique in one of our tutorials in the future.
Electronic Guitar Tuners
Tuning of the guitar is not easy in the beginning. You have to learn and practise it to make it a routine. Because you should tune your guitar every time before playing, you will practise it automatically. Nevertheless, if you keep having problems with an accurate tuning of your guitar, we recommend to use an electronic guitar tuner. We already told you about this guitar tuner for beginners. You can clip it to your guitar head and pick a string and the device will tell you if the pitch is too high or too low. This is the most comfortable way for beginners to tune a guitar. Another electronic tuner is the Korg GA1. It is very cheap but has a lot of functions. Beside the visualization of the pitch for each string, It can generate reference tones and is suitable for bass guitars too. That way it can be useful for a group of musicians playing different instruments. Compared with the electronic guitar tuner for beginners, its disadvantage is, that it can not be clipped onto the guitar head and therefore needs silence during the tuning process.
Different Tunings
For completeness It hast to be said, that there is not only one way to tune a guitar. There are some tablatures or songs that require to change the tuning of your guitar. For example, for some classical pieces you will have to tune the 6th string to a D instead of an E. That means, during the tuning process you will have to use the 7th fret of the sixth string instead of the 5th fret when you compare it with the fifth string. There are many other ways to tune the guitar, but at the moment, our default tuning should be sufficient. We will get to know more details about the relations between notes and strings in one of our next tutorials. With that knowledge, you will be able to tune your guitar however it is needed in any tablature.
I hope this tutorial was helpful. For Feedback or questions, please leave a comment below.
Browse the other parts of this article series:- How To Buy Your First Acoustic Guitar
- How to hold the guitar
- How to Tune a Guitar